How to Upload Documents From Canon Printer to Windows Vista Computer
Scanning the Original and Sending to a Computer
By changing the paper document to PDF or XPS, y'all tin send the file to shared folder on the calculator.
Benefits from Changing the Paper Document to PDF or XPS
Yous tin save space.
You can improve search performance of the text on the certificate.
You can reduce press toll and relieve paper.
You lot tin can set a password for security.
| Required Condition |
| Y'all can connect to the computer with the shared folder from this machine via the network. |
This section describes how to create a "PDF-Scan" shared folder on a bulldoze of a Windows figurer that is continued to the machine via the SMB protocol and send a scanned two-sided document to that folder every bit a PDF file.
The screens may differ, depending on the model of the automobile and on attached optional products.
The screens may differ, depending on the operating organisation of your computer.
Creating a Shared Folder
Registering an Accost
Sending from the Motorcar
Creating a Shared Folder
For Windows
1.
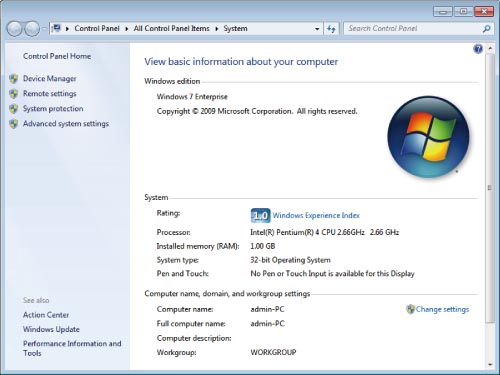
Cheque for the calculator proper noun.
For Windows XP, right-click [My Estimator] → click [Manage] → right-click [Calculator Direction (Local)] → click [Properties] → check for the computer name on the [Computer Proper noun] sail.
For Windows Vista/Windows vii, click [ ] (Get-go) → right-click [Computer] → click [Backdrop] → check for the calculator name.
For Windows eight, place the cursor on the acme correct (bottom right) of the desktop → select [Search] → correct-click [Computer] → click [Properties] → check for the computer name.
For Windows 7
two.
Correct-click a bare expanse on the desktop → click [New] → [Folder] to create a new folder → enter 'PDF-Scan' as the binder proper noun.
three.
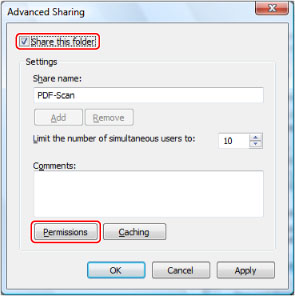
Select [Share this folder].
For Windows XP, right-click the "PDF-Scan" folder → select [Backdrop] to brandish the [PDF-Scan Backdrop] dialog box → click the [Sharing] tab → select [Share this folder] → click [Permissions].
For Windows Vista/Windows 7/Windows 8, correct-click the "PDF-Scan" folder → select [Properties] to brandish the [PDF-Scan Properties] dialog box → click the [Sharing] tab → click [Avant-garde Sharing] → select [Share this folder] → click [Permissions].
| Note |
| If [Permissions] is not displayed in the [Sharing] tab, click [Tools] → [Folder Options] → [View] → deselect [Use simple file sharing]. For more information, see the manual provided with Windows XP. |
For Windows 7
4.
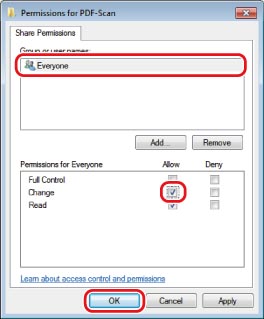
Select [Everyone] → check that [Allow] for [Change] is selected → click [OK]. If [Permit] is not selected, select [Allow] → click [OK].
5.
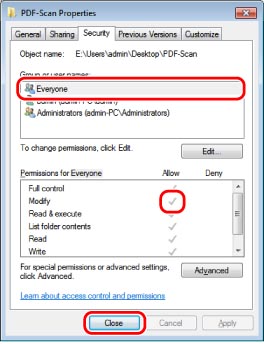
For Windows XP, in the [PDF-Scan Backdrop] dialog box, click the [Security] tab → click [Add together]. For Windows Vista/7/8, in the [PDF-Scan Properties] dialog box, click the [Security] tab → click [Edit] → [Add together].
6.
Enter 'Everyone' → click [OK].
7.
For Windows XP, select [Everyone] → select [Permit] for [Change] → click [OK]. For Windows Vista/vii/8, select [Everyone] → select [Let] for [Modify] → click [OK] → [Shut].
For Windows 7
A shared binder to send information is created.
| NOTE |
| For Windows XP, the shared folder is displayed as |
 . For Windows Vista/Windows 7, the shared binder is displayed as
  .
.For Mac
You tin specify the settings to utilize the shared folder ([Public] binder).
1.
Click [Sharing] on the [System Preferences] screen.
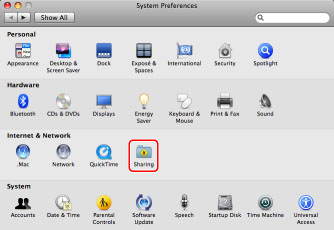
2.
Select [File Sharing].
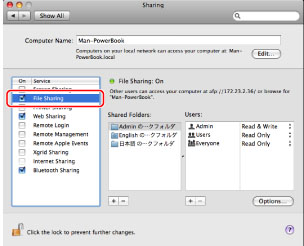
Sharing the [Public] binder is started on the network.
You can use the shared binder in [Drop Box] under [Public]. You can access the [Driblet Box] equally follows: On the [Go] menu, click [Home] → enter the login user name → select [Driblet Box] under [Public].
| NOTE |
| The screens may differ, depending on the operating system of your computer. |
Registering an Address
You lot tin can register an Email address finer from the Remote UI.
| Note |
| The screens may differ, depending on the operating system of your computer. |
Using the Remote UI
1.
Start a Spider web browser → enter the IP accost of the car in the address bar.
http://<IP accost of the auto>
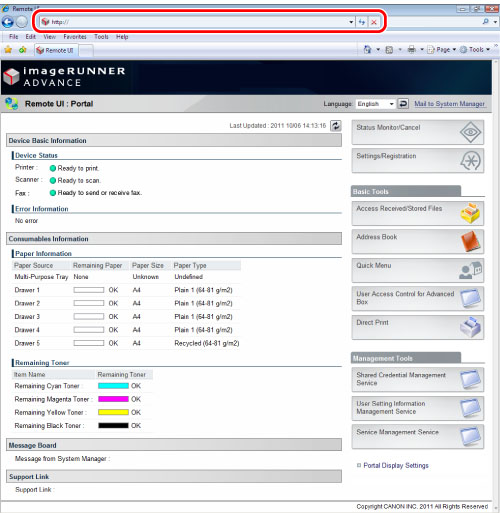
The Remote UI screen appears.
| NOTE | ||||||||||
| If you want to confirm the IP accost of the automobile, press If you cannot access the Remote UI, follow the procedure below to set proxy exceptions.
If an mistake message is displayed and you cannot access the Remote UI, follow the procedures described below. Page Not Found:
HTTP 404 File Not Found: Confirm that the IP address is right. Confirm the IP address setting range in "Network." |
 (Settings/Registration) on the control console and follow the process below.
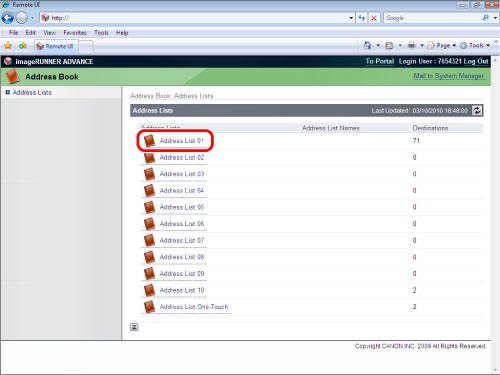
2.
Click [Address Book] → [Address List 01] on the Address List screen.
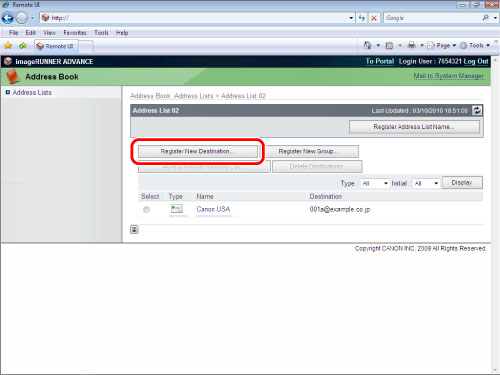
3.
Click [Register New Destination] → Register New Destination screen appears.
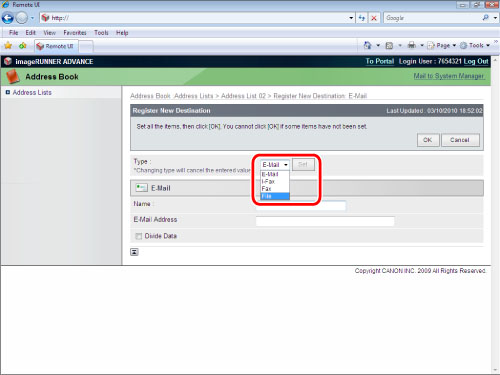
4.
Select [File] from the Type → click [Set].
5.
Specify the desired settings in the register file screen → click [OK].
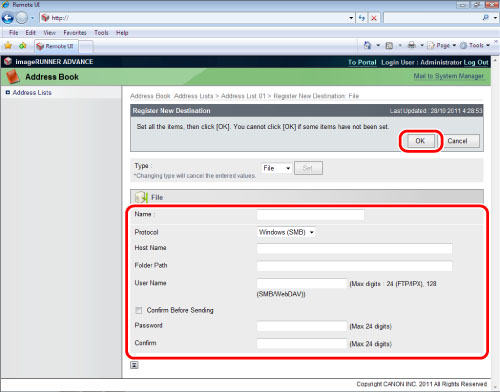
| Name | Enter a name for the destination. |
| Protocol | Select [Windows (SMB)]. |
| Host Proper name | \\Computer name\PDF-Scan |
| Folder Path | If you want to create a folder named "Temporary" in the PDF-Scan folder, enter '\Temporary'. You tin can send without entering. |
| User Proper name | Enter the sender's user name (the name used to log in to the figurer). |
| Confirm Before Sending | Select to brandish the confirmation screen earlier sending. |
| Password | Enter the password that corresponds with the user proper noun. |
| Ostend | Enter the password again. |
The address is registered.
Using the Touch Panel Brandish
1.
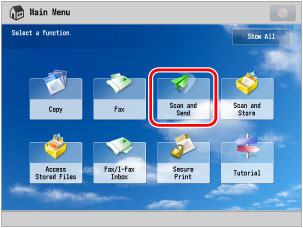
Press [Scan and Transport] on the Main Menu screen.
| NOTE |
| If the Main Menu screen is not displayed, printing |
 (Chief Card).
two.
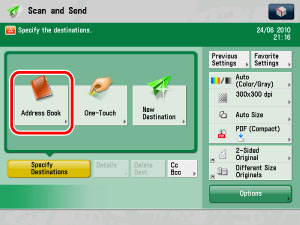
Select [Address Book].
3.
Printing [Register/Edit].

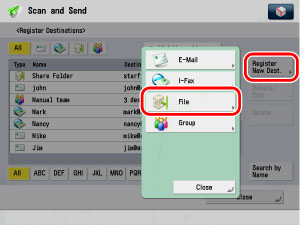
four.
Press [Register New Dest.] → [File].
five.
Specify each setting.
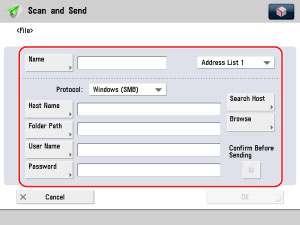
| [Proper name]: | Enter a proper name for the destination. |
| Protocol: | Select [Windows (SMB)]. |
| [Host Proper name]: | Enter the computer name that you checked in step i in "Creating a Shared Folder" for Windows, or step 2 in "Creating a Shared Folder" for Mac. |
| [Folder Path]: | Specify the folder on the computer you want to store the data. |
| [User Proper name]: | Enter the sender's user name (the name used to log in to the computer). |
| [Countersign]: | Enter the password that corresponds with the user proper name. |
six.
Printing [OK].
Sending from the Machine
You can create an OCR (Text Searchable) PDF file from a two-sided original.
1.
Identify your originals on the platen glass or in the feeder → press [Scan and Ship] on the Chief Card screen.
| NOTE |
| If the Main Menu screen is not displayed, press |
2.
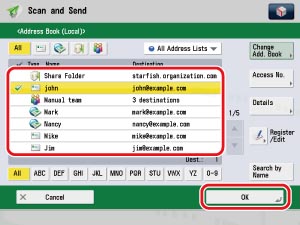
Press [Address Book].
3.
Select the registered destination → press [OK].
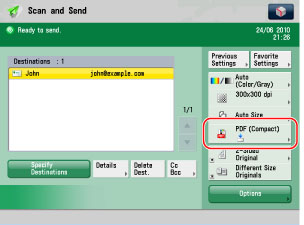
4.
Printing the File Format button.
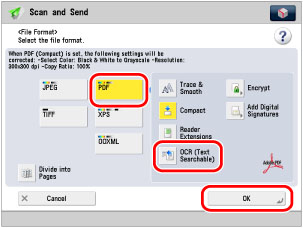
5.
Select [PDF] → [OCR (Text Searchable)] → [OK].
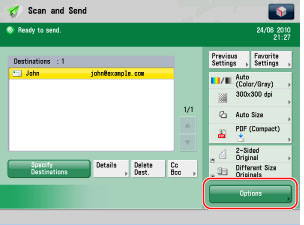
6.
Press [Options].
7.
Press [2-Sided Original] → specify the type of two-sided original → press [OK].
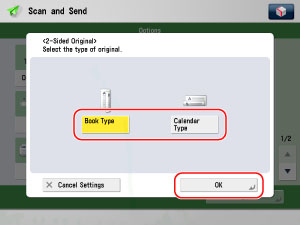
To scan different sized originals, press [Different Size Originals]. This mode enables you to scan different size originals with the same widths (A3 and A4, or B4 and B5, etc.) or different widths (A3 and B4, or A4 and B5, etc.), together as i group past setting them in the feeder. Yous can reduce the time it takes to send because yous practice not need to transport co-ordinate to the original size.
8.
Printing  (Start).
The certificate is changed to searchable PDF, and is sent and stored in the shared folder.
Reference Data
Compact PDF or XPS Files
You can catechumen original colour/grayscale images scanned at a resolution of 300 dpi to meaty (approx. 1/10 original size) PDF or XPS files. This fashion eliminates the issue of the big file size of digitized documents, reducing colour documents to the size of black-and-white documents. This too enables you to reduce the load on the network and servers. For details, encounter "Compact PDF or XPS."
Searchable PDF or XPS (Universal Send Advanced Characteristic Set is required)
This mode enables y'all to perform OCR (optical character recognition) to extract data that tin can be recognized as text from the scanned prototype, and add it equally a transparent layer of text to create a PDF or XPS file that is searchable. A searchable PDF or XPS file enables you to quickly search for the necessary information on the PDF or XPS. For details, run into "Searchable PDF/XPS/OOXML."
Trace & Smooth PDF (Universal Send Advanced Feature Set is required)
This mode enables y'all to carve up and extract the text, line drawings, and groundwork of a scanned image, and convert the text and line drawings to scalable outline data to be placed on the background when creating a PDF file.
Enhanced text quality
Outlining the text edges eliminates "jagginess" even when the text is enlarged, enhancing the overall quality of the text in the PDF.
Practical application of data
The outlined information on the PDF can be extracted and used in Adobe Illustrator.
| NOTE |
| The Trace & Polish PDF mode tin be used with the Searchable PDF, Encrypted PDF, Digital Signatures, and Reader Extensions modes. Trace & Smooth PDF is linked with Compact PDF. Thus, if yous select the Trace & Shine PDF mode, Compact PDF is automatically set and the PDF file size is reduced. If you select Trace & Smoothen for the PDF file format, the resolution must be set to 300 dpi, and color or grayscale must be specified. For details, run into "Trace & Smooth Settings." |
Irresolute the Default Settings
By storing the specified send settings as the default settings, you can recall the settings without specifying the settings over again. For details, see "Generate File."
Troubleshooting
If You lot Cannot Utilize SMB to Communicate with Windows
If y'all cannot employ SMB to communicate with Windows, follow the procedures below.
Firewall:
For Windows XP
Right-click [My Network Places] → select [Properties] → right-click [Local Area Connectedness] → select [Properties] → click the [Advanced] tab →click [Settings] → click the [Full general] tab → click [Off] → [OK].
For Windows Vista
Right-click [Network] → click [Properties] → [Windows Firewall] → [Turn Windows Firewall on or off]→[Change settings] → select [Off] → [OK].
For Windows 7
Correct-click [Network] → click [Properties] → [Windows Firewall] → [Turn Windows Firewall on or off]→[Turn off Windows Firewall] for [Habitation or work (individual) network location settings] and [Public network location settings]→ select [Off] → [OK].
For Windows 8
Identify the cursor on the top right (bottom right) of the desktop → select [Search] → [Control Panel] → [Windows Firewall] → [Plow Windows Firewall on or off] → select [Turn off Windows Firewall (non recommended)] for [Individual Network settings] and [Public Network settings] → [OK].
Shared Simple File Settings:
For Windows XP
Click [Start] → [Command Panel] → [Folder Options] → the [View] tab → select [Use simple file sharing] for [Advanced Settings] → [Apply].
For Windows Vista
Correct-click [Network] → click [Backdrop] → click the arrow on the correct of [File Sharing] for [Sharing and Discovery] → select [Plough on file sharing] → [Utilize].
For Windows 7
Right-click [Network] → click [Properties] → [Change advanced sharing
settings] → select [Turn on network discovery] → [Turn on file and printer sharing] → [Save Changes].
For Windows 8
Place the cursor on the superlative correct (bottom right) of the desktop → select [Search] → [Command Panel] → [Network and Sharing Center] → [Change avant-garde sharing settings] → select [Turn on network discovery] → [Plough on file and printer sharing] → [Save Changes].
Backdrop of the Shared Folder:
Correct-click the shared folder → select [Properties] → click the [Full general] tab → deselect [Read-only] → [Apply].
Admission Privilege of the Shared Folder ([Sharing] Sheet):
Right-click the shared folder → select [Properties] → click the [Sharing] tab → select [Permissions] → [Apply].
Security Policy:
Click [Commencement] → [Control Panel] → [Authoritative Tools] → [Local Security Policy] → [Local Policies] → [Security Options] → [Microsoft network server: Digitally sign communications (always)] → [Disabled] → [Apply] → restart Windows.
Login Password:
If you are using Windows, you lot tin can login to the computer using a local account without a password gear up. Nonetheless, the following issues may arise:
If <Bank check the login destination, user name, and password> is displayed, you cannot ready the login/destination from the automobile.
Yous can set the login/destination from the automobile, but you cannot employ the Push Scan part.
The in a higher place issues related to accounts with no specified countersign arise considering authentication was non performed at the time the folder on the network was accessed.
From a security perspective, and to avoid the above issues, login using an business relationship with a countersign.
Logging In an Active Directory Environment:
When a computer that one or more users log on to is restricted past the system ambassador in an Active Directory environment, follow the process below to register the name of the computer.
Open up the user account properties dialog box. Click [Logon To] to open the [Logon Workstations] dialog box → fix the computer name in the user account properties dialog box to "CANON + the last 8 digits of the MAC address of the reckoner + 00". For example, if the MAC address of the figurer you are using is "00:00:xi:22:33:44", set "CANON1122334400."
Source: https://oip.manual.canon/USRMA-0134-zz-CS-enUV/contents/CS4251_practical564_scanningtheoriginalandsendingtoacomputer.html
Enregistrer un commentaire for "How to Upload Documents From Canon Printer to Windows Vista Computer"